Fractions are one of those math topics that can either fascinate or frustrate young learners. For third graders, fractions introduce the idea that there are numbers greater than zero, but less than one, which is a very challenging shift in perspective. It’s no wonder that misconceptions about fractions often surface as soon as they are introduced!
These misunderstandings usually arise from students applying their knowledge of whole numbers to fractions, which is a natural but problematic leap. The good news? With the right tools and strategies, we can guide our students toward a solid conceptual understanding of fractions and tackle those misconceptions head-on.
So let’s explore some of the most common misconceptions about fractions, why they happen, and practical ways you can address these misconceptions in your classroom.
Misconception #1: The Bigger the Denominator, the Bigger the Fraction
This is a very common misconception that almost every child has when they are first introduced to fractions! Many students assume that a fraction like 1/8 is larger than 1/4 because eight is bigger than four. The misconception comes from thinking about denominators the same way they think about whole numbers; a bigger number must mean more, right?
How to Address It:
Contextual Sharing Activities: Relatable contexts are key to helping your students truly grasp this concept. Here’s an idea to try: Create a scenario where students pretend to share “brownies.” Use origami paper as the “brownies,” and have students fold and cut the paper to share among different numbers of people. Have them “share” the “brownies” between 2, 4, 8, 3, and 6 people, naming the portion size of the brownie each person would get for each scenario. As they work, guide a discussion about how the more people they share with (the larger the denominator), the smaller each piece becomes. This hands-on, real-world context makes the abstract concept of fractions much more relatable.
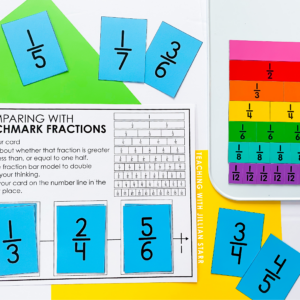
Fraction Circles or Tiles: Give each student a set of fraction circles or tiles and allow them time to freely explore and compare the pieces. For example, you might ask students to place a ⅓ piece next to a ⅛ piece and compare their sizes. Guide their thinking with questions like, “Which piece is larger? Why do you think that is?” Record their observations on an anchor chart so they can refer back to their discoveries. This hands-on activity helps students clearly see that the pieces with the larger denominator are actually smaller pieces.
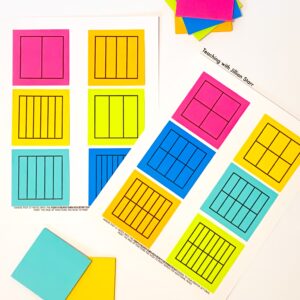
Paper Folding Activity: Give students pieces of paper and guide them to fold each one into halves, fourths, eighths, thirds, and sixths. (Full disclosure: folding into thirds and sixths can be quite tricky!) Have them cut and label each piece, then display the strips side by side. Seeing the pieces get smaller as the denominator grows creates a powerful visual that helps clear up the confusion. Plus, this activity makes a fantastic anchor chart… one that stayed up in my classroom all year!
Misconception #2: Fractions Aren’t Numbers
Growing Number Line: It’s crucial for students to explore fractions on a number line early on; otherwise, they may develop the misconception that fractions aren’t actual numbers. I recommend starting a growing number line on the first day of fraction instruction.
Tape a long piece of colored masking tape on the wall, labeling the starting point as 0 and the ending point as 2. On day one, you may ask your students to place the numbers 1 and ½ on the number line (these can be written on small index cards or sticky notes).
This is called a “growing number line” because, rather than the line itself growing, we slowly add more numbers to it each day. We start by placing more simple fractions like ¼, ⅛, and ¾. As we progress through our exploration of fractions, the fractions become more complex, such as 4/4 and 10/8.
By placing fractions on the number line right away, students begin to see fractions as numbers on the number line, not just symbols representing parts of a whole. (Side note: This would work wonderfully with a math clothesline too, if this is something you use in your classroom already!)
Misconception #3: All Fractions Are Smaller Than One Whole
Some students think that all fractions are automatically smaller than one whole. This misconception comes from seeing fractions as “parts” without fully understanding that fractions can also represent quantities greater than one.
How to Address It:
Fraction Circles or Tiles: Bring out the fraction circles or fraction tiles again (or better yet, never really put them away) and have students build fractions greater than one, such as 5/4 or 11/8. Ask them what they notice and encourage students to “rename” the fraction by identifying how many wholes they see and the leftover part of the whole. This hands-on, visual process helps reinforce the idea that fractions can represent more than just a whole.
Number Line Comparisons: Yep, back to the number line again! The growing number line we talked about earlier also helps tackle this misconception. When students start counting by fractions beyond 1 and see them placed on the number line, they really begin to understand that fractions can be less than a whole, but they can also be greater than 1. And just like whole numbers, fractions go on forever!
Misconception #4: Fractions with the Same Numerator Are Always Equal
It wouldn’t be surprising for a student to think that 2/3 and 2/5 are equal just because they both have a numerator of 2. This confusion comes from focusing only on the numerator and overlooking the fact that the denominator is just as important. Together, the numerator and denominator give us the full picture of the fraction’s value… they work as a team to represent a single number.
How to Address It:
Relatable Contexts: Using relatable contexts can quickly help clear up these misconceptions for most students. For example, you could share a story about two friends who each had a footlong sub for lunch. One friend cut their sub into 3 equal parts, while the other cut theirs into 4 equal parts. Both friends ate 2 pieces of their sub. Then ask, “Did they eat the same amount of sub? How do you know?” Encouraging students to draw a picture of this scenario will be key. Be sure to clarify that the “whole” (in this example, the footlong subs) are the same shape and size.
Measuring cups: This is one of my favorite activities to introduce how to compare fractions with common numerators and denominators… and it’s perfect for clearing up the misconception that fractions with the same numerator are equal. Grab a set of measuring scoops (bonus points if you have a ⅛ cup scoop!), two clear plastic cups, and a bucket of sand or colored water.
Give students pairs of fractions with the same numerator, like 2/4 and 2/3. Have them measure out those amounts using the scoops and pour them into the cups to compare. Repeat with several examples and then discuss what they notice.
Students will quickly see that even though the number of scoops (numerator) was the same, the size of the scoops was different, which made the amounts different. This activity also works well to address the misconception that fractions with the same denominator must always be the same size.
Misconception #5: Fractions Are Only Represented as Parts of a Circle
One of my favorite books about teaching fractions is Beyond Pizzas and Pies by Julie McNamara and Meghan M. Shaughnessy. It emphasizes the importance of exposing students to a variety of contexts and models when working with fractions; moving beyond the classic pizza and pie examples. While sharing pizzas is a relatable context for students, overusing it can lead to misconceptions, like thinking fractions only work with circle models or struggling to understand other representations.
I’m not saying to ditch the pizza examples entirely, they’re great once in a while! But it’s important to mix in other contexts and models, like number lines or sets, to give students a well-rounded understanding of fractions and how they can be represented in different ways.
How to Address It:
Explore Rectangular Models: Present students with real-world scenarios that lend themselves well to rectangular models, like brownies, chocolate bars, or sandwiches. These familiar contexts make it easy for students to practice drawing rectangular fraction models. Start by having them name the fractional part in a given model or draw a model to represent a specific fraction. Then take it up a notch… show them just the part and challenge them to draw the whole. This gets them thinking more deeply about the relationship between the part and the whole!
Fraction Sets with Counters: Counters are a fantastic hands-on way to show that fractions can represent parts of a set, not just parts of a shape. Start with a small set, like, 8 counters, and ask, “What would ¼ of this set look like?” Let students divide the group into four equal parts, noticing that each part has 2 counters. Then explore other fractions like ½ or ¾ , using different totals to encourage flexible thinking about changing wholes. To add a challenge, ask questions like, “If ⅓ of my counters is 4, how many do I have in total?” The tactile experience of working with counters helps students build a meaningful understanding of fractions as parts of a set.
Number Lines (Again!): Number lines are, once again, a fantastic tool for clearing up this misconception. When students regularly place fractions on a growing number line several times a week, they’re much less likely to develop the idea that fractions can only be represented using a circle or pie model.
Conclusion
Understanding fractions is a big leap for second and third graders, but by addressing their misconceptions about fractions with hands-on activities and visual models, we can guide them toward a deep, conceptual understanding. Remember, the goal isn’t just to teach students to calculate with fractions but to help them see fractions as numbers that represent parts of wholes, quantities greater than one, and relationships between numbers.
By using strategies like fraction tiles, paper folding, number lines, and relatable contexts, you’ll empower your students to navigate the world of fractions with confidence. And who knows? Maybe they’ll even start to think fractions are a little fascinating too!


Leave a Comment