Mentioning volume to most adults will likely make them think of how loud the TV is. While this is almost definitely the more common use of the word these days, when we talk about measuring volume, we’re referring to the measure of the amount of space inside a three-dimensional object. (I’d argue, we encounter this meaning even more than the loud sounds coming from our devices.)
Measuring volume is measuring the amount of space inside of an object, which is used to most efficiently pack items into containers. For example, if you’ve ever needed to mail a bunch of smaller items, you’ve likely considered the volume of the box you needed so that you didn’t have a lot of extra space and so that all of your items fit.
Students generally first encounter volume mathematically in fifth grade. When measuring volume is boiled down to just the formula, it becomes deceptively simple. However, we always want our students to have a strong conceptual understanding in addition to having procedural fluency, but how do we support that work? Let’s dig in!
Measuring Volume: Progression of Understanding
Before students even set foot in a classroom, they are experimenting with volume at a very young age. How you might ask? Let’s think about those all-time favorite toddler activities: filling a bucket with sand, filling and dumping cups of water at a water table, and putting blocks into a bin to clean up. Once in school, the work students do in 3rd and 4th grade with arrays and area models lays the foundation for their understanding of measuring volume. However, to ensure students are successful in subsequent grades, it is imperative to explicitly connect measuring volume with area. Otherwise, students may see these two intertwined topics as completely unrelated, leading to several misconceptions.
Connecting Measuring Volume to Area
When introducing any new concept to students, I always provide them with multiple opportunities to investigate the concept with manipulatives. With measuring volume, omnifix cubes are the best! Unifix cubes or any other kind of cube that only connects on opposite ends are not ideal because we want them to be able to connect on all sides. The size of cubes doesn’t matter too much, but I know some of my colleagues prefer the inch size and others prefer the centimeter size because it takes up much less space to store – either way!
Using cubes when beginning to investigate volume also reinforces the units we use when measuring volume: cubic units. Why? Because they are cubes, of course! The experience of holding and manipulating cubes creates a meaningful experience for students that they can connect to later.
Step One: Introducing Volume
So when just starting our work with volume, I show students a prism that I have made out of cubes and ask them to discuss how they would figure out how many cubic units my prism is. Next, I have students make their own figures that have the same volume. Many students will begin measuring volume by counting their cubes – the perfect starting point!
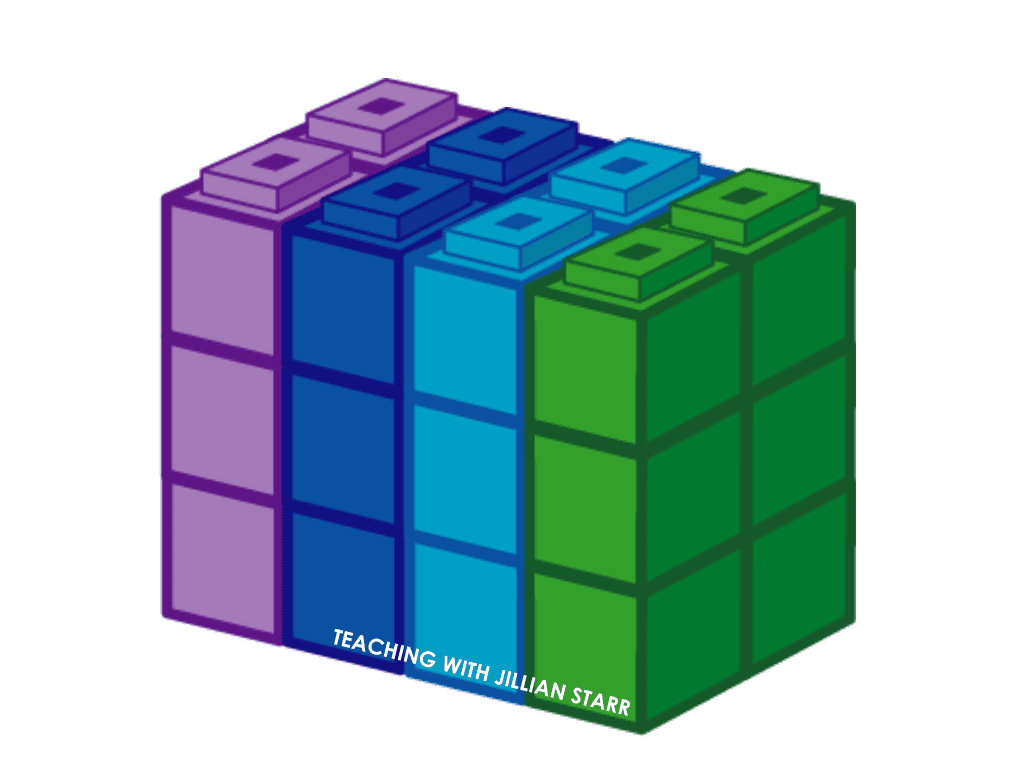
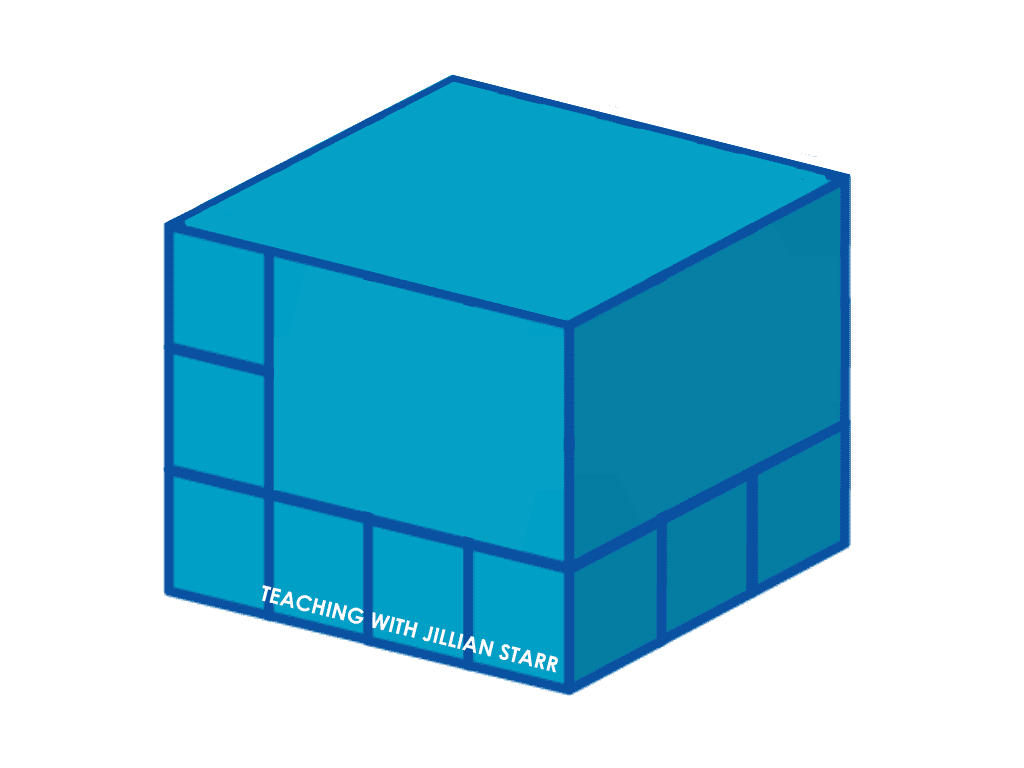
After numerous experiences with counting unit cubes and once students are successfully using counting to determine the volume of a prism, I will show students an image of a rectangular prism that shows the base layer of cubes along with the cubes stacked up to make the height of the prism. However, this image does not show the remainder of the cubes that make up the prism, preventing students from counting them. This is similar to how we typically move students from counting squares in an area model to multiplying.
Step Two: Creating Strategies to Measure Volume
Without directing students to use any particular strategy, I ask students to work together to find the volume of that prism. Some students will use cubes to build the prism and then count them. Even though we’re beginning to progress to more abstract representations, this is still great! It just tells us that those students aren’t ready to make the transition to pictorial representations yet. Instead, they are beginning to make a direct connection between the image and the physical 3D prism.
Other students will realize that they can sketch in the lines where the cubes would be and use that to count. Finally, some students will be ready to make the jump to abstract representations and use multiplication and/or addition to represent the volume of the figure. When discussing how students found the volume, I’ll make sure to have students share each of these methods but we’ll spend much of the time on drawing the connection between the physical prism, the image, and the equations that students have come up with.
Specifically, we want students to realize that they can use multiplication to find the number of cubes on the bottom layer of the prism. Similar to when finding the area of a rectangle, we can multiply the length and width. Then, we can use the height that is shown to determine the number of layers the prism has and either multiply by the number of layers or use repeated addition to measure volume.
Step Three: Solidifying the Connection Between Area and Volume
Once students have made the connection between measuring volume to their understanding of area, the formula for volume makes sense to them. It is no longer a formula that needs to be memorized but it has meaning: find the area of the base by multiplying length and width and then multiply that by the height. In other words, the formula is length x width x height or l x w x h. In fact, many students will actually begin to use the formula for volume on their own without having ever been directly instructed to do so. It just makes sense!
At this point, I provide students with lots of practice with finding the volume of prisms with these types of images. Students who still need practice with building the prisms or sketching in the cubes can continue that work and then all students can progress toward using the formula.
Step Four: Moving from Cubes to Dimensions when Measuring Volume
Finally, I will introduce images of prisms without any cubes but with labeled dimensions instead. Students now need to make the connection between this most abstract representation of a rectangular prism and their experience with the prisms they have built with cubes. Those who have internalized the understanding of volume can meaningfully use the formula to measure the volume of that prism rather than simply plugging in numbers.
This strong conceptual understanding will help students when they get to those “tricky” problems where extra dimensions are labeled or where they have to find the volume of a composed figure or they have to find the length of a missing side. These problems are more challenging not only because they are multi-step but because they require a good understanding of volume as counting the cubes inside of a prism.
Addressing Misconceptions when Measuring Volume
My favorite part of explicitly connecting area and volume for students is that it often prevents students from internalizing common misconceptions about measuring volume. Here are the top two I see from students most often:
- Labeling volume with square units rather than cubic units
- Finding the surface area of the prism rather than the volume
If students have had a lot of experience with measuring volume by using connecting cubes, they have a connection between volume and actual cubes. As a result, most students will avoid confusing the units when labeling their answers.
Without a conceptual understanding of volume, many students will forget the formula for volume and not know how to problem solve. I have seen many students like this find the area of one side and multiply that by the number of sides rather than the number of layers. Unfortunately, these students have found the surface area of the prism rather than the volume.
The good news is that when you ensure that students have a solid conceptual understanding of volume, you are much less likely to see these misconceptions. Even more, making the connection to area makes measuring volume a clear progression of the work students have been doing for years. Students have a stronger understanding, can problem-solve more successfully, and are less likely to forget what volume is about and how to measure it. Win-win-win!
I hope you have found my approach helpful! If you give it a try, let me know how it goes. I look forward to hearing from you!

