Truth: I can’t resist a school supplies aisle. The vast selection of pens, pencils, markers, and crayons immediately draws me in. It is like the class materials are waiting just for me. I want to buy and use all of them. Add. To. Cart.
Now, hang on to that visual. This is the same feeling our students get when they step into their new classrooms on the first day of school. All of those freshly purchased and recently organized class materials call to them. While that excitement is terrific, it can also lead to much frustration down the road.
Today, let’s talk about introducing those enticing new class materials in a way that builds independence and limits chaos. We’ll cover everything from crayons to counters, and I’ll spill my tricks to introducing usage and organizing with purpose.
Discovering Class Materials
To use a material, students must know how to use it. Simple, right?
Many students come in with foundational knowledge of how to use some materials. But, I never assume anything. Instead, I ensure that there is at least some introductory experience with class materials before I expect kids to use it independently.
I teach how to use supplies in two ways: Guided Discoveries and Open Explorations.
Guided Discoveries
Guided Discoveries are one of the backbones of a Responsive Classroom environment and also are an excellent, structured way to teach students how to use class materials appropriately. The purpose of a guided discovery: get kids excited about a class material while creating a shared understanding of how to use it.
First, I introduce and name the new material. As I introduce the material, I ask open-ended questions about how students have used it before.
For example, I could reveal our crayon collection. I would ask questions like, “What can you do with a crayon?” or “How have you used crayons?” In return, I could get a long list of answers: “Melt them into new crayons,” “Draw,” and “Write.”
Next, students model how to use the material. That’s right. While the activity will be open-ended, and I will support students by demonstrating at a later time, I also want students to remember to use the class material respectfully. The most empowering way to do that is: Let them model their ideas.
For example, “Today, we will explore how to use crayons respectfully and carefully. What are different ways of using crayons to keep them in good shape for other students?” When I call on a student, they will say their idea and then show the class what to do.
Third, students get to explore using the material as a whole class. I encourage students to practice using the material in as many ways as possible. In my example with crayons, students often feel pressure to make something “good.” I emphasize that there isn’t an end goal in exploration and experimentation. It is a time to test out new strategies.
Finally, students share! Sharing encourages students to inspire each other. Personally, I love using gallery walks.
Open Exploration
Open exploration of class materials is less structured. The goal of Open Exploration is to give all students some experience with a material before we discuss best practices or use it with a purpose. This can work with consumable materials like crayons or markers but also pairs well with items such as math manipulatives. In Open Exploration, I begin with a concise introduction. I give students loose instructions about how Open Exploration works. We briefly discuss how to use supplies carefully. Then, it is time to explore!
During the exploration phase, I am in a constant state of motion in a vital role: cheerleader. I want students to experiment throughout this phase. So, I walk around encouraging students to keep going. For example, imagine a classroom exploring the use of crayons. I might encourage students to use the tip of the crayon for dark lines and the side of the crayon’s tip for lightly spreading of color.
Introduce & Display Bit by Bit
For many years, I tried to set up my class materials like the back-to-school aisles at supply stores—colorful, enticing, and full of new pencils, pens, and markers. But, I realized that tantalizing my students with all the materials at once was backfiring.
While it is tempting to put everything out immediately, I encourage you to wait.
Now, I introduce and display my class materials bit by bit. I do a guided discovery or open exploration with each available material. And I’m not just talking about pens, pencils, and crayons. The same thing goes for math manipulatives and literacy tools.
I promise that a bit-by-bit strategy will pay off BIG in the long run. Students will slowly amass a knowledge base of how to use each material. Why? Because in addition to usage, I also teach clean-up, including the routines of taking out class materials and putting them back.
One More Trick
Remember that teaching students how to use materials is teaching students a new skill and routine. They are often learning fine motor skills, processes, and theories simultaneously. Like anything you teach, it needs to be scaffolded and differentiated. That is why I always teach students how to use class materials with simple activities.
I demonstrate and model new class materials with simple activities in a whole group lesson. That way, students can focus on the skill of using the supplies and practicing the routines without the additional intellectual stress of learning a new concept.
In the first few days of school, I often teach basic class materials (pens, pencils, markers, crayons, etc.) with time to draw or reflect. I teach math manipulatives and literacy tools with review activities. Students will feel much more successful and empowered to use the materials later!
Labels, Labels, Labels (and storage)
I love labels. And it isn’t just because labels are pretty. They have a purpose.
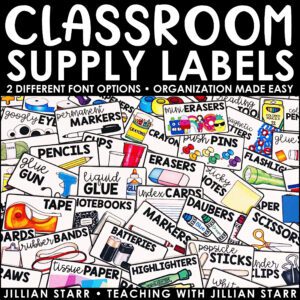
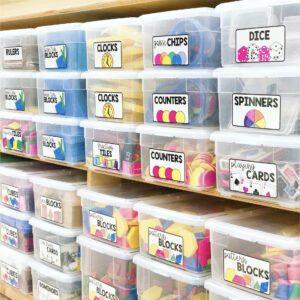
CLEAR labels help students quickly identify each material. The benefit: students can quickly and independently find what they are looking for. Labels limit crowding around class material shelves and make for efficient clean-up after use.
Here are some tips for effective material labels:
- Simple, bold text
- Add clear visuals
- VISIBLE placement of labels on material containers
Containers
The containers for materials are equally important. When designing your classroom, function is everything. And two significant components of functional choice are visibility and movement. Make sure you are using containers that are:
- Easy to use
- Fit in the space provided
- Fit the material provided
- Can move from one space to another with ease
- Show the material
I did not collect the perfect containers for class materials overnight. Every year, I assess all of my classroom supplies, furniture, and containers. I ask myself, “Did this fit its purpose? Does it fit the space? Is there a more effective product?” And, like clockwork, I tweak and change the materials and containers I use every year.
However, I’ve got a few staples:
- Clear Boxes with flat fronts for math manipulatives
- Tupperware containers for individual sets of math manipulatives and literacy tools
- Color-coded drawers for crayons and markers
- Flip-top boxes for individual supply sets
- Photo cases for individual sets of dry erase materials
- Metal tins (with wrap-around labels) for class materials such as pencils, markers, and pens
Ultimately, you know your space best, and the cost is a limiting factor for most of us—my advice: collect these things over time. Do your best each year. In the end, keep what works and search for something new next time.
Now it is time for you to prepare your class materials for the new school year. I hope this blog helps you set up and introduce materials in ways that help your class run smoothly right from the state. Don’t forget: your classroom is unique, and you will notice your students’ needs as soon as you set up the space and they walk through the door. Let me know how these tips help! And, I love to hear your tricks as well.
Did you enjoy this post? Then make sure to check out the rest of the Back to School Starter Series! From establishing classroom routines to setting up a classroom, we’ve got you covered!

